GotSafety Desktop Admin – Training Scheduler
With the training scheduler, you will be able to assign specific training to your departments. If your employees’ email or phone number is in the system, they will get notifications when a training is due.
1 – Navigate to Training Scheduler
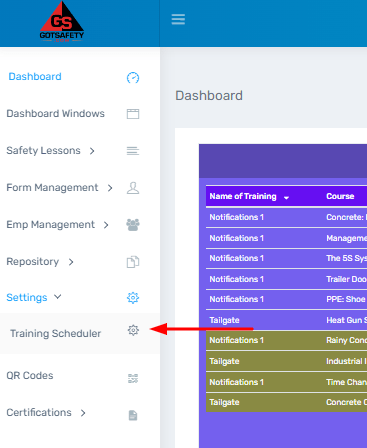
- From the “Dashboard”, click on “Settings” on the left.
- This will give you a drop down menu to select “Training Scheduler”.
- From here you can create required or optional training for your departments.
- You can schedule training weekly, monthly, yearly, etc.
- If your employees have emails and/or mobile numbers in the system, they will receive a notification two days prior to the scheduled training, and continually for 7 days past the training’s due date.
2 – CReating a New Training Schedule
- To the top right, click on the “Add Training” button.
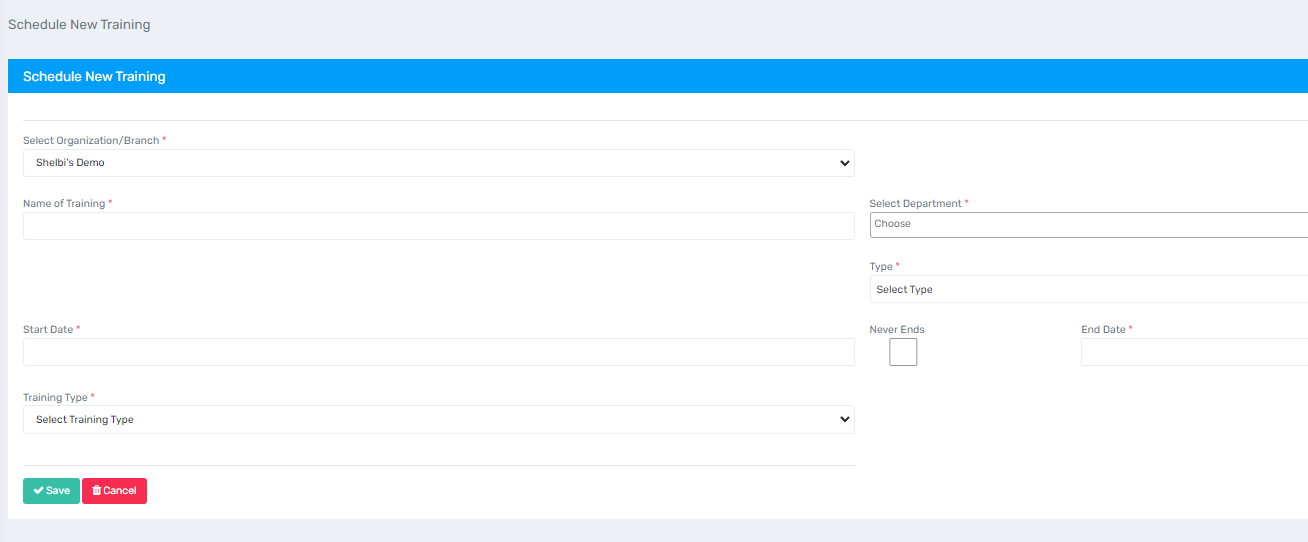
- In the “Name of Training Module” box, enter the name the training will be known by, for example Tailgate Meeting or Toolbox Talk.
- The “Status” box will allow you to select whether a training scheduler is “Active” or “Inactive”. If “Status” is marked as “Active”, the training schedule will proceed as intended, sending notifications and having the lessons appear for employees to take.
- If “Status” is marked as “Inactive”, employees won’t receive notifications or see the training that is set up until it is marked as “Active”. By doing so, you leave certain schedules active for employees to take training from, and leave others inactive until you are ready to have employees take it.
- You can also change the status of a training schedule by clicking on the “Check” box underneath the “Action” column when viewing your training schedules that have been set up in the “Settings” tab, under “Training Scheduler”.
- The “Select Department” box will allow you to select the department(s) the training is for.
3 – Schedule The Training
- The “Type” box is the type of training you want the schedule to be which may be “Required” or “Optional”.
- In the “Start Date” box, you will select when you want the system to start tracking the training. This will be the date the first training is due.
- If you want the training to be ongoing, select the “Never Ends” box. By doing this, you can schedule additional dates and lessons without needing to set up a new training schedule each time.
- In the “End Date” field, you can select when a training has a definitive end date. If you select the “Never Ends” the “End Date” field will disappear. You will not be able to have more trainings added past the end date.
- The “Training Type” field will allow you to select the frequency that the training will reoccur, whether it be weekly, monthly, etc.
- Once you select the “Training Type”, choose the day, week, month, etc. that you would like the training to reoccur on.
- Lastly, the system will automatically generate the fields for the corresponding dates once you complete the above steps. Choose the topics you wish for employees to train on for each date by clicking in the blank box to the right of the date and searching for the lesson by keywords. You can add multiple trainings to a specific date by continuing to click in the box where you have previously added lesson topics and then searching for them there. If you want to add additional dates, select the “Add More” button at the bottom of the screen.
- If you want to change the date for an individual training, simply click in the box that the date is displayed in to the left of the training topics, and either select the date from a calendar, or manually type it in.
- Select “Save” to begin the training schedule.
- Once the schedule has been saved, you can select the “Pencil” icon to edit.
3 – Track Your Training in the Dashboard
- Once a training has been scheduled, you will be able to track the information from the “Dashboard”.
- Click on the “Dashboard” at the top left side of the page.
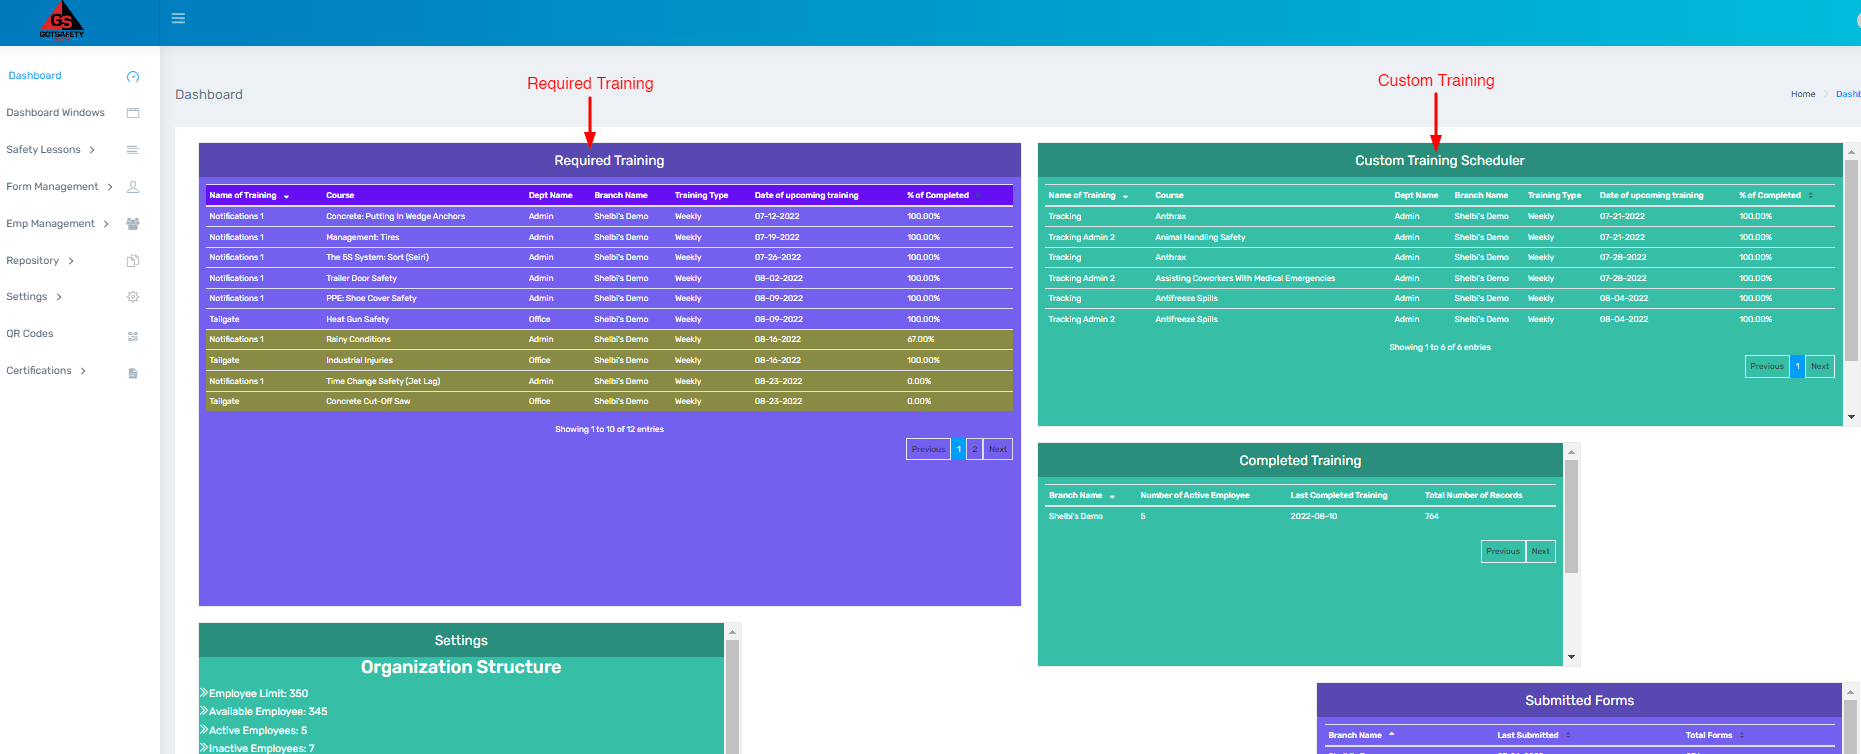
- The “Required Training” box will have a window allowing you to see the scheduled training that is marked as “Required Training” in the scheduler. It will also show the department it is for and what percentage of employees have completed the training.
- “Optional Training” will have a dashboard called “Custom Training Scheduler”, allowing you to see the scheduled training, what department it is for and what percentage of employees have completed the training. The system will track required and optional training from the dashboard 30 days before and after it is due.


